Lighting
Lights in a scene is a cheap way to obtain realistic feelings. Human brain deals with 3 dimensional shadowed objects; so it may confuse itself whether the terrain is not properly shadowed, or not shadowed at all, leaving a disturbing feeling of the scene. Applying shadows lets the user to focus on details and gives a good length and shapes approximation whithout moving camera.
We can distinguish between two types of shadows:
- direct lighting from the Sun;
- auto shadowing.
In this page, we will see these two techniques, however only the first one has been implemented in our program, due to time delays.
Direct lighting
This first lighting process is quite simple to understand: for every mesh point, we calculate its normal vector and a light (basically the Sun's) is applied in order to generate direct lighting.
The problem we face is the following: LoD Bias shrinks the vertices number and Geomorphing application changes their positions. Therefore, their normales are not exactly the sames depending on user's position. Moreover, removing some vertices from the mesh will notably change final rendering: it becomes impossible to apply a vertices based lighting model (neither with OpenGL nor Cg) as they may change throughout time.
We then prefer using textures where lighting is preprocessed at startup. This is typically a LightMap.
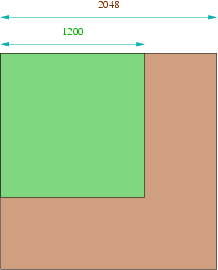
One calculates, depending on HeightMap's height and width, an optimal texture size that OpenGL can handle: we must use the minimum power of 2 capable of having all of the height map (at least with the OpenGL version we used). It is evident that an HeightMap where size is already a power of 2 will be the best, and all the others will have more or less unused values. For example, a size slightly under 1024 (1000*1000) won't create lot of unused space, but 1200*1200 will use a more noticeable one (as we will be forced to use only a 2048*2048 texture) like the figure below shows. All these unused values are given to the graphic card, but this is a little disadvantage considerably compensated by the final render's quality this technique adds.

Processings are only done once at startup, and we can even save them for other instances. So this calculation step doesn't need quite intensive optimizations anymore.
Point's normal vector
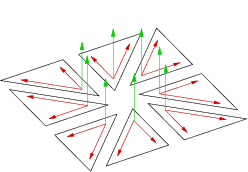
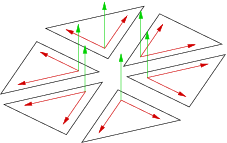
Normal vector on a single point is done by calculating mean of the normal vectors of the surrounding faces to this point. We then have to do the 8 vectorial products from the figure below. In the first time, we tried to drop some of the amount of calculations; we only do the six vectorial products from the second figure. Result is practicaly the same, and we save a large number of process.


Lighting coefficient
When we know the normal vector in one point, we then have to found the lighting coefficient from the Sun. This calculation is quite simple: we want a value from 0 (shadowed) to 1 (totally lightened) depending on normal vector, point's position and Sun's position. This coefficient is a scalar product between point's normal vector and lighting vector from the Sun to the point. Result is then saved in the LightMap, which is given to OpenGL and Cg for the terrain shadowing.
Auto shadowing
Direct lighting explained in the section above is useful to quickly represent mesh shape, but it isn't physicaly correct as it doesn't show that the terrain can shadow some of its parts. We then discussed about a way to achieve that and increase scene's realism by preprocessing auto shadowing directly into the LightMap. Idea is to know whether a point is facing the Sun, and then apply the method explained above, or if it is shadowed, and then its lighting coefficient is 0.
To handle this case, we apply the following method for every single point of the mesh:
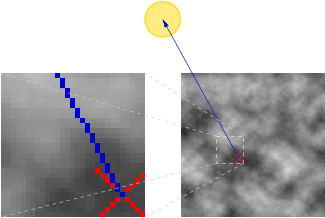
- one calculates the line between point's position and Sun's then it is rasterized, with the median point algorithm for example;
- one compares if the point on this line is higher or lower than the one on the HeightMap:
- if it is lower, then the point we currently test is not lightened by the Sun, therefore its lighting coefficient is 0;
- if it is higher, then we proceed to the next line's point, until we have reached either the Sun or an HeightMap's edge, where the direct lighting process is applied.

